Showing posts with label DIY. Show all posts

Wednesday, April 30, 2014

wedding wednesdays-DIY cake

I have been talking about all the DIY projects I did for our wedding for the past few weeks. This week is the last DIY project I will be sharing with everyone. It's also not a true DIY since I did not bake the cake myself, but I did go a less traditional, more DIY-type route for our cake.

it took us two full carts for the cupcakes

I started off with buying a bunch of cupcakes from my grocery store's bakery. I know cupcakes have been quite the new thing in wedding cakes, but I liked the idea for several reasons. One is that they're cheap and easy for any bakery to make look good. Two is that I could have different flavors of cake for my guests. Three is that they saved us money at the venue because we didn't require cake cutting and plates, so there was no "cake cutting" fee. I ordered 5 dozen chocolate cupcakes with white cloud frosting, and 5 dozen vanilla cupcakes with white cloud frosting from the bakery. They were only $6.99 a dozen. For less than $70 we were able to have cake for all of our wedding guests, and then some.

vegan cupcake for my sissy

We had one wedding guest that would not be able to eat the cake, regardless of how many we ordered. My sissy is a vegan and so of course I ordered a special vegan cupcake just for her! No, she didn't ask me to, but I love that I was able to get her in on the wedding cake action.

the cupcakes set up on the tiers

We rented a tiered cake holder to display all the cupcakes in the shape of a traditional wedding cake. 

our cake 

We still needed a cake for us to cut in the cake cutting ceremony. I wanted to add some color and have a special cake for us. A friend of mine had just started a cake baking/decorating business and since she was just starting out, I was able to get a small cake for a very good price. And she did an amazing job! We had a vanilla cake with teal fondant with pearl white frosting dots and a scalloped edge on the bottom. I didn't want a traditional cake topper, so I had her craft flowers out of sugar (I think that's what is was) and arrange them on the top like a floral centerpiece. She dusted them with a pearlized food glitter so they were very sparkly. I loved her cake, it looked so awesome! We set it on the top tier and the whole display looked great!

the final wedding cake display


Wednesday, April 23, 2014

wedding wednesdays-DIY signs

Instead of having a full bar for our guests, we chose to offer certain drinks for our guests to limit our bar tab, but also have a full bar available if the guest wanted to buy their own drinks. We needed a way to let our guests know what beverages we were offering. We needed to have a drink menu set up at the bar. I chose to make my own bar menu out of card stock, our home printer, glue sticks and cheap picture frames. 

close up of the bar menu

I started with a shimmery silver card stock to serve as the outer mat. For the inner mat, I used a matte, slightly textured teal card stock. I then printed our menu on white card stock using our color printer at home. I don't own any design software so all I did was create a menu in Microsoft Word with a font I liked. I did a few different sizes and layering designs before picking which style looked best.

the finished, framed design for the bar menu

Once I had a design I liked, I used a glue stick to attach the 3 pieces of card stock together to form the finished, matted menu. I used a paper cutter to trim the mats down to size. I then found a cheap frame on clearance, and framed it like a picture. That's it!

the instructions for the guest book

For our guest book, we had a unique guest book tree that required a little instruction. I used the same steps I did for the bar menu to create instructions to display next to the guest book. 

These were both a quick, easy DIY project to add a little extra to our wedding!

*I apologize about the images, they're just pictures I had taken while making them last summer. All of our wedding decor is back in California in storage, so I couldn't take better pictures!*

Wednesday, April 16, 2014

wedding wednesdays- DIY guestbook

So this DIY project wasn't technically done by me, but by my mother-in-law. Still, it was a DIY project done to add some creativity to our wedding as well as save some money. There have been so many new ideas out there for weddings guestbooks. Brides rarely use the traditional book that guests sign with a fancy pen. I wanted to find something that fit us and that we could display after our wedding. 

our engleheart family swing

After browsing lots of wedding websites, we decided that we wanted a guestbook tree. The idea is that you have a tree printed onto a poster size paper and guests use thumbprints as the leaves and sign their name. My mother-in-law is good with art and design and she was the one who designed the tree for us. We had her add a swing onto the tree so George, the girls and myself could place our thumbprints on the swing. She designed the tree and took it to a printing store to have it printed on a poster size paper. She also chose three different stamps pads in shades of green and teal for the leaves.

the guestbook table

For the display at the wedding, we set the framed tree out with the stamp pads, fine point black permanent markers and some hand wipes. We also had a sign displayed with instructions for our guestbook tree. Guests chose a color and added their thumbprint leaf and then signed their name near the leaf with the pens. They were then able to clean their hands with the hand wipes. 

the finished product, hanging on our wall

We love how the tree turned out and have it displayed in our house. I love that we can look at a part of wedding everyday!

Wednesday, April 9, 2014

wedding wednesdays-DIY centerpieces

Centerpieces can range from very ornate and expensive to nonexistent. I wanted something simple and budget friendly, but I still wanted them to catch the eye of our guests. Some brides decide to forgo centerpieces and flowers, but I wanted flowers and decorations, without breaking the bank. I did a lot of browsing on Pinterest to come up with ideas and ended up with centerpieces that were sparkly, simple and fit within our budget.

my centerpiece design

The first thing I did was come up with a design. I wanted a round mirror as the base, with a square vase in the center filled with grayish toned rocks and a large white hydrangea. I also wanted turquoise glitter square votives with candles to surround each vase. The pure white of the hydrangea would draw the eye, while the glittered votives would add some color. With the mirror underneath, the reflection from the glitter and candles would add lots of light and sparkle. Also, the grayish rocks in the vase would compliment the silver and gray tones used throughout our wedding as well as add a natural look.

the mirror, votives and vase

I first looked for the vases and found the ones I liked, but they were $12 each! I asked around and luckily our friends, the Archers, had vases from their wedding that we could borrow for free. They were rectangle and slightly smaller than the square ones I wanted, but they had a similar look and free is always good! Then we looked into the hydrangeas. At first we looked into fake ones, since we assumed fake would be cheaper. For 1 hydrangea, it was $10, and we could get by with 1 per table. Then we talked to our florist and they were only $6 a stem and they were incredibly full and 1 per table was more than enough. Needless to say, we went with the real ones! Now onto the rocks. I found a pack of rocks at Michael's that were perfect and 1 pack would fill 2 vases. I decided to wait to buy until their next sale came out and luckily they went on sale for $1 each (originally $2.99 each)! I looked for mirrors, and not too many places carried them, and they were expensive. I looked into a party rental store and they rented large round mirrors for $2 each, so we rented those!

the gorgeous, huge hydrangeas

 the plain square votives I used

While the centerpieces were designed and put together by myself (with the help from my lovely bridesmaids!) the main DIY part of these were the votives. You can find plain votives and colored ones, but it was really hard to find glittery turquoise ones so I ended up making my own. Looking around town, even plain square votives could be as expensive as $4 each. I wanted 4 per table, plus more to line the head table. That was going to get pricey. I searched online and found some in the right size and shape, and they even came with candles to put inside! I bought a pack of 72 votives and candles for $68. I still had to add some glitter. I bought some turquoise glitter and Mod Podge from Michael's and decorated them myself. The glitter was $5 a jar, and I used 3 jars. The Mod Podge was $6 and I nearly used the entire bottle. I painted the inside of the votive with a layer of Mod Podge, dumped glitter inside and shook it (covered with a plastic bag) and then dumped the excess glitter back into the jar. Once they dried, I sealed the glitter with another layer of Mod Podge.

the votives post my DIY glitter-ification

Here's the price breakdown of my centerpieces:

vases: free x 1 per table = $0
hydrangea: $6 x 1 per table = $6
rocks: $1 x 1/2 bag per table = $0.50
mirrors: $2 x 1 per table = $2
votives: $68 for 72 (about $1 each) x 4 per table = ~$4
glitter and Mod Podge: divided out per table it was about = ~$1.20

total cost for each centerpiece = ~$13.70

the final result

Not bad, right? By renting items, shopping around and doing a little DIY, we were able to have gorgeous centerpieces that fit in our budget!

Wednesday, March 26, 2014

wedding wednesdays-the groomsmen gifts

When we first started planning our wedding, I saw this cute idea for the groomsmen gifts. It was a little felt lined wooden box with a rocks glass, whiskey, coke and a cigar. I showed it to George and we both agreed that they would be perfect gifts for his four groomsmen. I looked for almost a year for these wooden boxes and didn't find any that were the size we liked, the right design or not crazy expensive. After searching for so long and coming up empty handed, I decided to make them myself.

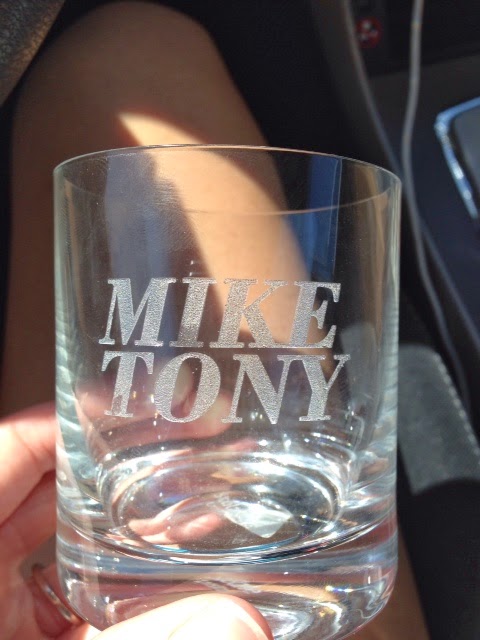
I found unfinished wooden boxes in the perfect size at Michael's. I then bought some sheets of black felt and wood stain and went to work! I stained the boxes a dark mahogany and then cut the felt to size and glued it in place as to line the interior of the box. To fill the boxes, I wanted a personalized rocks glass, a small bottle of Captain Morgan, a small can of coke and a cigar. I got both the rocks glass and the rum at Bevmo. I even had a friend who etched the glasses for free. 

one of the glasses after being etched

George found cigars at a local smoke shop and I just picked up the mini cans of coke from Walmart. The result was a unique, reusable, personalized and handcrafted gift for each of the groomsmen. I didn't get any pictures of the finished gifts before we gave them to the guys but I do have a picture of them in progress though.

how they looked, except I hadn't lined the lid yet and we used coke, not sprite

What I liked about these gifts is that they were able to enjoy them on the day of the wedding. As they were getting in their tuxes, they all had a cocktail to help calm their nerves. And then afterwards, at the reception, the men were able to go out together and have a celebratory cigar. For less than $20 each, we made these fun groomsmen gifts.

making a cocktail with their gift

Wednesday, March 19, 2014

wedding wednesdays-DIY flower girl accessories

I've gone over all my major vendors for my wedding, but there's more to wedding planning than the vendors. There's all the small details that you would never think about but end up taking over your brain in the months before your wedding. Since we were on a tight budget, I did a lot of things myself to not only save money, but to put my own touch and style into the wedding. And sometimes it was out of necessity because I couldn't find anything I liked, so I made something myself! In the next few weeks, I'm going to go over my DIY wedding projects. 

My first DIY project that I'm going to talk about is the accessories for the flower girls. Their headband and the basket for the flower petals. I decided to make the headbands myself to save money. I wore a very nice headband and wanted the girls to have something similar but didn't want to spend too much money. A lot of the girls headbands I found were too expensive or too ornate. 

the headband before I customized it

After looking at almost every store I went into for months, I found these plain ivory headbands in the girls section at a Target store in Roseville. They were the right color, they had similar fabric and texture as my headband and they were cheap! Only $5! I was lucky in that I got the last 2 on the rack.